Posted in 2023
How to use GitHub Actions to automatically upload to GitHub Wiki
- 02 December 2023
GitHub is a great platform for hosting open source projects. It provides a lot of features for free, including a wiki for documentation. However, the wiki is primarily designed to be edited through the web interface. This is not ideal for a lot of reasons as it makes it difficult to track changes from the repository. But there is a way to automatically upload to the wiki using GitHub Actions as GitHub provides a way to checkout the wiki as a separate repository.
The first step is to create a GitHub Action that will upload the wiki. This can be done by creating a new file in the .github/workflows directory. The following example shows how to create a GitHub Action that will upload the wiki on every push to the master branch and on every change to the .github/workflows/wiki.yml file or the wiki directory.
Adding Google Analytics to Sphinx
- 24 November 2023
Creating and maintaining a website is a lot of work and it is nice to know which pages are being visited and how people are finding your site. Google Analytics is a great tool for this and it is easy to add to your Sphinx site. But adding it to your Sphinx Sphinx blog is not as easy as it could be. This post will show you how to add Google Analytics to your Sphinx site instead of modifiying the theme or template files.
The first step is to create a Google Analytics account and get your tracking ID. This is a long string that looks like G-XXXXXXXXX. You can find it in the admin section of your Google Analytics account.
Use magic methods __setitem__() and __getitem__() in Python
- 30 September 2023
In Python, there are two magic methods that can be used to implement the behavior of the subscript operator []. These methods are object.__setitem__() and object.__getitem__(). The first one is used to assign a value to an item, the second one is used to retrieve an item.
The following example shows how to use these methods to implement a memory class as a list of bytes that was used in the 6502 emulator. The memory class has two methods get() and set() that are used to retrieve and assign a value to a memory address.
Chaining methods in Python
- 14 September 2023
Method chaining is a programming style in which multiple method calls are made on the same object, in sequence. Each method call returns the object itself, so the next method can be called on it without having to assign the object to a variable in between.
This can make code more concise and readable, as it can be written as a single line of code instead of multiple lines. It can also make code more efficient, as the object does not have to be passed around between methods.
Using environment variables in a devcontainer
- 04 September 2023
Hardcoded variables are never a good idea and one solution is the update the during deployment with Ansible for example. Another option is to set read those variables from the environment and maintaining them via systemd via a separate environment file or as part of the container deployment.
The example below is how Django reads the environment variables to configure the database connection to Postgresql. This way the application can easily be configured as is described in Environment variables set by systemd and the application itself never has to be modified or redeployed.
Reporting Flake8 finding as GitHub Annotations
- 01 September 2023
In Extending GitHub Actions with Annotations the output of GitHub Actions was transformed into Annotations that could be shown in the web interface. The example shows that part for Flake8 which is a framework for different plugins to be combined and scan Python code on common mistakes and improvements. But later in 2023 a plugin was release for Flake8 to generate a report that can be used by GitHub Annotations.
By changing to GitHub Actions workflow file as shown in the example below, then the plugin flake8-github-annotations is installed and the flake8 commands are executed with the option --format github like as with yamllint. The lines to add the probem matcher can also be removed.
Check Python with Flake8 Bugbear
- 29 July 2023
Flake8 is a Python tool that checks Python code for style, programming errors, and help reduce code complexity. It is a wrapper around PyFlakes, pycodestyle, and Ned Batchelder’s McCabe script. Flake8 has a plugin structure and there are many plugins available. One of the plugins is Flake8 Bugbear. Flake8 Bugbear is a plugin for Flake8 that finds likely bugs and design problems in your program. It is a plugin for Flake8 that adds rules from the community that are not included in the core flake8 package.
As Flake8 Bugbear is a plugin for Flake8, you need to install Flake8 first. You can install Flake8 Bugbear with pip for example and in the example below Flake8 Bugbear is installed into a virtual environment.
Use systemd timers to make PostgreSQL backups
- 27 July 2023
Systemd timers are a great way to replace cron jobs. They are more flexible and can have dependencies that can defined in easy statements instead of creating a script to check for the dependency. One of the use-cases is to use systemd timers to create PostgreSQL backups and remove old backups. In this example, we will create a backup of two databases, db1 and db2, and remove backups older than 10 days.
First step is to install PostgreSQL on the system. This example is for Debian or Ubuntu and uses the root user to connect to the database. It is recommended to create a user with limited privileges to connect to the database.
Start with Google Home Automation
- 25 July 2023
Home automation is a great way to put your home to work for you. With Google Home, you can build your own automated routines to make your home smarter and more comfortable. You can also use the Google Home app to control your smart home devices from anywhere. And while other solutions exist, Google Home is a platform that is easy to use by most people. The options were only limited but now you can use the Google Home Automation editor to create your own automations.
Let’s get started with an example to turn on the lights at sunset, but only if you are at home and the television is on. The first part of the script is the metadata. This is where you define the name and description of the automation. The name should be short and descriptive, while the description should be detailed and include everything the automation does.
Use systemd timers to make MariaDB backups
- 23 July 2023
Systemd timers are a great way to replace cron jobs. They are more flexible and can have dependencies that can defined in easy statements instead of creating a script to check for the dependency. One of the use-cases is to use systemd timers to create MariaDB backups and remove old backups. In this example, we will create a backup of two databases, db1 and db2, and remove backups older than 10 days.
First step is to install MariaDB on the system. This example is for Debian or Ubuntu and uses the root user to connect to the database. It is recommended to create a user with limited privileges to connect to the database.
Setting up a backup MX host with Postfix
- 21 July 2023
Running a backup MX host is a good idea if you want to ensure that e-mails are not lost if your primary MX host is down. With Postfix, this is easy to set up on a Debian or Ubuntu system as both are shipped with Postfix.
Mail servers that are misconfigured can be used to send spam. Therefore, you should closely monitor your mail server and make sure that it is not misused by spammers. In case of any doubt, you should shut down your mail server immediately.
Use removeprefix instead of lstrip to remove a prefix from a string
- 19 July 2023
Python 3.9 introduced new methods called bytearray.removeprefix() and bytearray.removesuffix() via PEP 616 to remove a prefix or suffix from a string. These methods are similar to str.lstrip() and str.rstrip() but they are more efficient and easier to use as they use a string instead of a set of characters. The latter is useful when you want to remove a prefix or suffix from a string that is not a set of characters.
Lets see an example where we want to remove the prefix www. from a list of URLs as shown below:
Manage multiple systemd service instances
- 17 July 2023
With systemd you can manage services like in post Environment variables set by systemd, but managing multiple instances of the same service is not so easy. For example, you have a service that runs a web server, and you want to run multiple instances of that service, each with different configuration. You can do that by creating multiple service files, but that is not very elegant. You can also use systemd templating, but that is not very flexible. The best way to do this is to use systemd instances.
For the example, we will create a service that runs a Python script. The script will print the value of an environment variable. The name of the environment variable will be the name of the instance. The script will be called env_variables.py and will be located in /usr/local/bin/. The service will be called env_variables@.service and will be located in /etc/systemd/system/. So let’s copy the script from the previous post as it can print the value of an environment variable to the standard output.
Installing Ansible with Python
- 14 July 2023
In posts Installing Ansible on Ubuntu 22.04 and Installing Ansible on Debian 12 Ansible was installed via the package manager. Another option is to install Ansible with Python in a virtual environment so you can have multiple Ansible versions installed on the same machine.
Since Ansible is written in Python, it can be installed in a Python virtual environment which is a self-contained directory tree that contains a Python installation for a particular version of Python, plus a number of additional packages. The virtual environment can be created with the venv module, which is part of the Python since version 3.4.
Installing Ansible on Debian 12
- 09 July 2023
Ansible is a great tool for automating tasks on multiple servers. It is easy to learn and use and it is very powerful. Ansible is written in Python and it uses SSH to connect to the servers or devices you want to manage like routers, switches, etc. There needs to be a central server where Ansible is installed and from there you can manage all your servers or devices.
In this post, we will create that central server and install Ansible on Debian 12 “bookworm” from the official Debian repositories. The first step is to update the system to the latest packages so that we can install Ansible from the official Debian repositories.
Using robots.txt with Cloudflare Pages
- 02 July 2023
Cloudflare Pages is a great way to host your static website. It’s fast, easy, and free to start with. While the egress traffic is free, you still pay in other forms as some bots will crawl your website. This is where robots.txt comes in handy. You can use it to block bots from crawling your website without having to configure anything with in Cloudflare.
The file robots.txt is used to tell bots where to find your sitemap. This is useful for search engines to find your sitemap. The sitemap is used to tell search engines what pages are available on your website. Lets start with a simple example to tell bots where to find your sitemap.
Upgrading to Terraform 1.5
- 01 July 2023
Pinning Terraform versions is a good practice to ensure that your infrastructure-as-code (IaC) is always deployed with a known version of Terraform. This is especially important when using Terraform Cloud, as the version of Terraform used to plan and apply changes is not always the same as the version used to develop the IaC. This can lead to unexpected errors and behavior, but this also requires that you keep your Terraform version up-to-date in the different configuration files.
In post Run Terraform within GitHub Codespaces Terraform was installed in the devcontainer using features. To upgrade Terraform, simply update the version number in the devcontainer.json file as shown below.
Run Terraform with GitHub Actions
- 24 June 2023
In previous post Run Terraform within GitHub Codespaces the Terraform environment was setup within GitHub Codespaces. The next step is to run Terraform with GitHub Actions via Terraform Cloud as part of a workflow and scan the Terraform code with KICS is the first step to reduce technical debt as described in the post KICS.
Let’s start with the workflow file .github/workflows/terraform.yml to run a KICS scan to verify the Terraform code. The workflow is triggered on push and pull request on the master branch. The Terraform code is checked out and the KICS scan is executed. The KICS scan is configured to run on the Terraform code in the directory terraform and the results are stored in the directory build. The KICS scan is configured to run on the Terraform platform and the output formats are JSON and SARIF so the results can be processed later. The KICS scan is configured to fail on high and medium severity issues. The KICS scan is configured to not add comments to the pull request and to exclude the query with the ID 1e434b25-8763-4b00-a5ca-ca03b7abbb66 during the scan.
Installing Ansible on Ubuntu 22.04
- 29 May 2023
Ansible is a great tool for automating tasks on multiple servers. It is easy to learn and use and it is very powerful. Ansible is written in Python and it uses SSH to connect to the servers or devices you want to manage like routers, switches, etc. There needs to be a central server where Ansible is installed and from there you can manage all your servers or devices.
In this post, we will create that central server and install Ansible on Ubuntu 22.04 from the official Ubuntu repositories or from the Ansible PPA repositories depending on your needs. The first step is to update the system to the latest packages so that we can install Ansible from the official Ubuntu repositories.
Create a bootable ISO with kickstart
- 30 April 2023
Installing Linux on a physical or virtual machine can be fun for a couple of time, but configuring a system can be combursome after a couple of times. Red Hat developed Kickstart to install and configure machines via the network, but also as part of an ISO file that can used in a virtual CD-ROM drive or on a bootable USB-drive.
The following steps are required to create a bootable ISO file with a kickstart file and when the ISO file is booted, the kickstart file is used to install and configure the system. Creating a bootable ISO file is not a difficult task, but it is a manual procedure. The following steps are required to create a bootable ISO file with a kickstart file.
Switching to molecule-plugins
- 28 April 2023
Ansible roles are a great way to organize and share your infrastructure-as-code between projects. Those roles can be tested with Molecule, which is a great tool to test your roles against multiple platforms and Ansible versions. Running these tests in a CI/CD pipeline is a great way to ensure that your roles are working as expected and that you don’t introduce regressions.
These tests can be executed in different forms, but the most common one is to use Docker containers. This is one of the configurations for Molecule, and it works great. The example workflow below shows how to run Molecule tests in a GitHub Actions pipeline:
How to minify websites with GitHub Actions
- 12 April 2023
Websites are usually made up of HTML, CSS, and Javascript. These files are usually not minified, which means that they are not compressed. This means that the files are not optimized for the web. This can cause the website to load slower than it should. This is especially true for mobile users. This is where minification comes in. Minification is the process of removing unnecessary characters from the files. This can include removing comments, removing whitespace, and removing unnecessary characters. This can make the website load faster and more efficiently.
Multiple ways to minify these files do exist. One way is to use a minifier online. Another way is to use a minifier locally on your computer, but both of these methods are not ideal. A more efficient way is to use a GitHub Action. This is a way to automate tasks on GitHub. This can be used to minify these files before creating an artifact and deploying this artifact to the web.
How to optimize PNG images
- 26 March 2023
PNG is a lossless image format that supports transparency. It is a good alternative to JPEG for images with a lot of detail and/or transparency. However, PNG images can be quite large. This post shows how to optimize PNG images instead of converting images to WebP as not everyone is ready to publish WebP images yet.
With optipng you can optimize PNG images. It is available in the repositories of most Linux distributions as shown below for Ubuntu and Debian.
How to Convert Images to WebP
- 25 March 2023
Websites have been using PNG and JPEG images for a long time. PNG images are lossless and JPEG images are lossy. PNG images are larger in size than JPEG images. WebP is a new image format that is developed by Google. WebP images are smaller in size than PNG and JPEG images and can be both lossy and lossless. WebP images are supported by all modern browsers nowadays and making it ideal see how you can quickly convert images to WebP and make web sites faster and more efficient to load.
The first step is to install the webp or libwebp-tools package. The package includes the command line tools to convert images to WebP and to view WebP images. The package is available in the default repositories of Ubuntu, Debian, Fedora, and CentOS. On Ubuntu and Debian, the package is called webp.
Add issues to projects on GitHub
- 22 March 2023
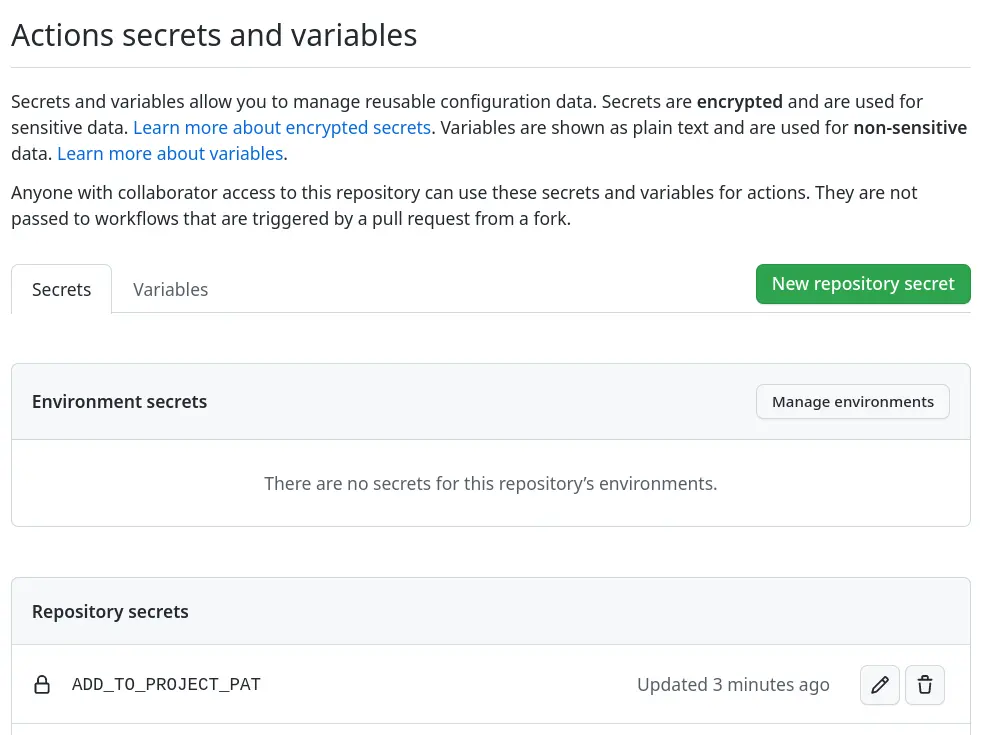
Adding issues to projects on GitHub is a great way to keep track of what needs to be done. This action will add issues to a project board on GitHub when they are opened or labeled. But adding issues to a project board is a manual process. The action actions/add-to-project automates the process of adding issues to a project board.
In the workflows the environment variable ADD_TO_PROJECT_URL is used to define the project board. The project board is defined by the URL of the project board. The URL can be found in the browser when the project board is opened. The URL is defined in the env section of the workflow file.
Implementing a Content Security Policy
- 21 March 2023
Implementing a Content Security Policy (CSP) for a website can be a daunting and difficult task as it can break your website when done incorrectly. But a CSP can help to guard against cross-site script attacks and data injection attacks on a website as it defines which resources are all allowed to be loaded or executed. This also reduces the risk of including unauthorized third-party content to be included or posted to another site.
Configuring CSP can be done by adding a HTTP response header or by adding a META-tags to the requested HTML content. The latter depends on the CMS to be executed correctly for all HTML content requested. Most sites therefore implement the HTTP response header method as all the common web servers and content delivery networks support this.
Fix an Ansible-lint key-order violation
- 25 February 2023
Ansible allows for structured configurations on how to deploy applications and servers, but also for repetitive tasks. All these actions are defined in YAML files that rely on indentation and this is where Ansible can act in a way that isn’t expected. With yamllint most formatting and layout issues can be found, but with ansible-lint also common mistakes for Ansible can be detected.
As ansible-lint is a step in the CI-workflow a dependency upgrade started a CI-workflow to scan all Ansible Playbooks to be scanned with the latest version of Ansible-lint and found a violation that must be resolved before the pull request can be successfully merged. Running Ansible-lint after checking out the code the error shown below was found and indicates that the order of the keys in YAML isn’t in the correct order.
Label and close stale issues
- 10 February 2023
Issues and pull-requests are part of projects and repositories, but can also be forgotten when they grow out of control. You could search for stale issues manually once in a while, but it is another task on someone’s calendar that has been done. Like with post Add labels to GitHub pull requests this also can be automated. This way the backlog can be kept small so the team working on doesn’t have too much outstanding and untouched work.
Both GitHub App probot/stale and GitHub Action actions/stale are solutions that can be used to scan for stale issues and pull-requests, and label them or even close them. Both solutions have their benefits and drawbacks, but let’s see how they’re configured.
Add labels to GitHub pull requests
- 08 February 2023
Labels on issues and pull requests can make it easier to understand the content, but also make paying attention to what has changed and selecting them easier. If a pull request only has the label terraform for example it indicates that only infrastructure changes are in play.
While multiple GitHub Actions exist the two main solutions are Probot Autolabeler and GitHub Actions Labeler. The first solution is based on a GitHub App that must be installed and have permission to update pull requests, the second solution is based on a workflow that runs a GitHub Action.
Create GitHub issues on a schedule
- 04 February 2023
In post Custom GitHub templates for issues, the first step was made to automate the workflow more by defining issue templates on the organizational level and assigning labels when creating a new issue. A human still needs to create the issue manually while some issues must be created on a schedule to deploy new certificates or run an Ansible playbook to patch servers for example.
Like in post Start using GitHub Dependabot where merge requests were automatically created for updated dependencies, issues can also be created on a schedule. Let’s create a workflow that creates an issue every month for recurring maintenance that must be done.
Custom GitHub templates for issues
- 03 February 2023
Automating workflows reduces the need to think about them, but can also guide new people in the right direction. One of these workflows is creating issues for example. One could use the default templates provided by GitHub to create an issue for a bug or a new feature. Only default templates may not fulfill all requirements needed for a smooth workflow for a project on GitHub.
By default, GitHub has templates for issues and pull requests, but on both organization and repository levels, an override can take place. Meaning that the most specific template set will be used when creating an issue or pull request. First, we will define templates for the whole organization by creating the .github repository within the organization.
Extending GitHub Actions with Annotations
- 04 January 2023
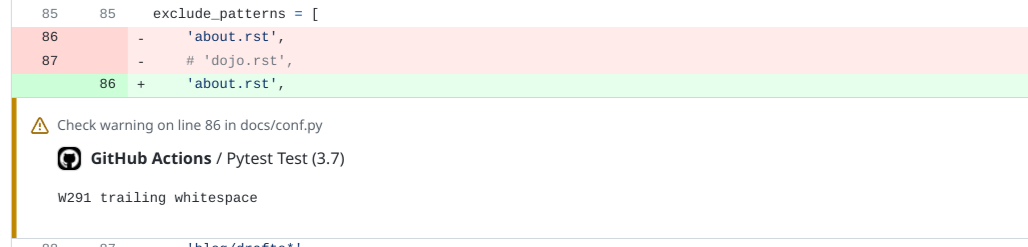
With the introduction of GitHub Actions automated testing became more accessible and integrated into the pull requests to make it more clear what is being merged and if it checks off all requirements. This makes other services like Dependabot easy to use and keep your code up to date, but these small changes in dependencies for example. Reviewing code or documentation changes can be more difficult when a linter like yamllint or flake8 gives an error or warning as you have to dig into the logs to search for what is wrong.
GitHub Actions also support annotations that can be presented in the web interface to directly see which notifications there are including files and line numbers as shown below. This way feedback from a workflow executed by GitHub Actions is presented in the web interface.
Require a specific Terraform version
- 03 January 2023
HashiCorp offers Terraform Cloud as a service to run Terraform and keep the state instead of having a local copy of the state databases. This is great to make full use of Infrastructure-as-Code tools like Terraform and everyone can run them without losing the correct state. But when setting up a deployment plan a specific version of Terraform has to be selected manually in the webinterface, and you also have to manually increase it when new versions come out.
As the version, for now, can only be set via the webinterface of Terraform Cloud and allow a lot of people to forget to set it to a higher version causing life-cycle-management issues plans do work for repository A, but not for repository B as both plans use a different version of Terraform. While currently now option exists to define the version of Terraform to use when the plan runs, the configuration allows to specify the version of Terraform is required.