All Posts
Adding Copy Buttons to Your Sphinx Documentation
- 26 October 2024
Have you ever wished you could easily copy code blocks directly from your Sphinx-generated documentation? The sphinx-copybutton extension makes this a reality. By adding a small button to each code block, you can effortlessly copy the code to your clipboard.
This is a fantastic way to enhance user experience and make your documentation more user-friendly as it allows readers to quickly copy code snippets for testing or reference. In this article, we’ll show you how to add copy buttons to your Sphinx documentation using the sphinx-copybutton extension.
Using Docker Compose in GitHub Workflows
- 02 August 2024
GitHub Actions is a powerful tool for automating your CI/CD pipelines. It allows you to run your tests, build your code, and deploy your applications with ease. One of the most common use cases for GitHub Actions is building and testing Docker images. The example below shows how to use Docker Compose in a GitHub Workflow to build and test a Docker image when the docker-compose.test.yml file is present that contains the test configuration.
This run a seperate executable called docker-compose to build and run the tests, but the error message shows that the command is not found. The error message is shown below:
Automate pull-request approval for Dependabot
- 12 July 2024
Dependabot is a service that automatically updates your project dependencies by creating pull requests. It is a great tool to keep your project up-to-date with the latest security patches and bug fixes. However, managing these pull requests can be time-consuming, especially if you have many dependencies. As a result, many teams end up ignoring Dependabot pull requests, which can lead to security vulnerabilities and other issues.
The example configuration below shows that Dependabot will automatically update the Docker base image and GitHub Actions. It ignores major version updates for Amazon Linux, Fedora, Oracle Linux, and Rocky Linux reducing the noise in the pull requests.
How to use GitHub Actions to automatically upload to GitHub Wiki
- 02 December 2023
GitHub is a great platform for hosting open source projects. It provides a lot of features for free, including a wiki for documentation. However, the wiki is primarily designed to be edited through the web interface. This is not ideal for a lot of reasons as it makes it difficult to track changes from the repository. But there is a way to automatically upload to the wiki using GitHub Actions as GitHub provides a way to checkout the wiki as a separate repository.
The first step is to create a GitHub Action that will upload the wiki. This can be done by creating a new file in the .github/workflows directory. The following example shows how to create a GitHub Action that will upload the wiki on every push to the master branch and on every change to the .github/workflows/wiki.yml file or the wiki directory.
Adding Google Analytics to Sphinx
- 24 November 2023
Creating and maintaining a website is a lot of work and it is nice to know which pages are being visited and how people are finding your site. Google Analytics is a great tool for this and it is easy to add to your Sphinx site. But adding it to your Sphinx Sphinx blog is not as easy as it could be. This post will show you how to add Google Analytics to your Sphinx site instead of modifiying the theme or template files.
The first step is to create a Google Analytics account and get your tracking ID. This is a long string that looks like G-XXXXXXXXX. You can find it in the admin section of your Google Analytics account.
Use magic methods __setitem__() and __getitem__() in Python
- 30 September 2023
In Python, there are two magic methods that can be used to implement the behavior of the subscript operator []. These methods are object.__setitem__() and object.__getitem__(). The first one is used to assign a value to an item, the second one is used to retrieve an item.
The following example shows how to use these methods to implement a memory class as a list of bytes that was used in the 6502 emulator. The memory class has two methods get() and set() that are used to retrieve and assign a value to a memory address.
Chaining methods in Python
- 14 September 2023
Method chaining is a programming style in which multiple method calls are made on the same object, in sequence. Each method call returns the object itself, so the next method can be called on it without having to assign the object to a variable in between.
This can make code more concise and readable, as it can be written as a single line of code instead of multiple lines. It can also make code more efficient, as the object does not have to be passed around between methods.
Using environment variables in a devcontainer
- 04 September 2023
Hardcoded variables are never a good idea and one solution is the update the during deployment with Ansible for example. Another option is to set read those variables from the environment and maintaining them via systemd via a separate environment file or as part of the container deployment.
The example below is how Django reads the environment variables to configure the database connection to Postgresql. This way the application can easily be configured as is described in Environment variables set by systemd and the application itself never has to be modified or redeployed.
Reporting Flake8 finding as GitHub Annotations
- 01 September 2023
In Extending GitHub Actions with Annotations the output of GitHub Actions was transformed into Annotations that could be shown in the web interface. The example shows that part for Flake8 which is a framework for different plugins to be combined and scan Python code on common mistakes and improvements. But later in 2023 a plugin was release for Flake8 to generate a report that can be used by GitHub Annotations.
By changing to GitHub Actions workflow file as shown in the example below, then the plugin flake8-github-annotations is installed and the flake8 commands are executed with the option --format github like as with yamllint. The lines to add the probem matcher can also be removed.
Check Python with Flake8 Bugbear
- 29 July 2023
Flake8 is a Python tool that checks Python code for style, programming errors, and help reduce code complexity. It is a wrapper around PyFlakes, pycodestyle, and Ned Batchelder’s McCabe script. Flake8 has a plugin structure and there are many plugins available. One of the plugins is Flake8 Bugbear. Flake8 Bugbear is a plugin for Flake8 that finds likely bugs and design problems in your program. It is a plugin for Flake8 that adds rules from the community that are not included in the core flake8 package.
As Flake8 Bugbear is a plugin for Flake8, you need to install Flake8 first. You can install Flake8 Bugbear with pip for example and in the example below Flake8 Bugbear is installed into a virtual environment.
Use systemd timers to make PostgreSQL backups
- 27 July 2023
Systemd timers are a great way to replace cron jobs. They are more flexible and can have dependencies that can defined in easy statements instead of creating a script to check for the dependency. One of the use-cases is to use systemd timers to create PostgreSQL backups and remove old backups. In this example, we will create a backup of two databases, db1 and db2, and remove backups older than 10 days.
First step is to install PostgreSQL on the system. This example is for Debian or Ubuntu and uses the root user to connect to the database. It is recommended to create a user with limited privileges to connect to the database.
Start with Google Home Automation
- 25 July 2023
Home automation is a great way to put your home to work for you. With Google Home, you can build your own automated routines to make your home smarter and more comfortable. You can also use the Google Home app to control your smart home devices from anywhere. And while other solutions exist, Google Home is a platform that is easy to use by most people. The options were only limited but now you can use the Google Home Automation editor to create your own automations.
Let’s get started with an example to turn on the lights at sunset, but only if you are at home and the television is on. The first part of the script is the metadata. This is where you define the name and description of the automation. The name should be short and descriptive, while the description should be detailed and include everything the automation does.
Use systemd timers to make MariaDB backups
- 23 July 2023
Systemd timers are a great way to replace cron jobs. They are more flexible and can have dependencies that can defined in easy statements instead of creating a script to check for the dependency. One of the use-cases is to use systemd timers to create MariaDB backups and remove old backups. In this example, we will create a backup of two databases, db1 and db2, and remove backups older than 10 days.
First step is to install MariaDB on the system. This example is for Debian or Ubuntu and uses the root user to connect to the database. It is recommended to create a user with limited privileges to connect to the database.
Setting up a backup MX host with Postfix
- 21 July 2023
Running a backup MX host is a good idea if you want to ensure that e-mails are not lost if your primary MX host is down. With Postfix, this is easy to set up on a Debian or Ubuntu system as both are shipped with Postfix.
Mail servers that are misconfigured can be used to send spam. Therefore, you should closely monitor your mail server and make sure that it is not misused by spammers. In case of any doubt, you should shut down your mail server immediately.
Use removeprefix instead of lstrip to remove a prefix from a string
- 19 July 2023
Python 3.9 introduced new methods called bytearray.removeprefix() and bytearray.removesuffix() via PEP 616 to remove a prefix or suffix from a string. These methods are similar to str.lstrip() and str.rstrip() but they are more efficient and easier to use as they use a string instead of a set of characters. The latter is useful when you want to remove a prefix or suffix from a string that is not a set of characters.
Lets see an example where we want to remove the prefix www. from a list of URLs as shown below:
Manage multiple systemd service instances
- 17 July 2023
With systemd you can manage services like in post Environment variables set by systemd, but managing multiple instances of the same service is not so easy. For example, you have a service that runs a web server, and you want to run multiple instances of that service, each with different configuration. You can do that by creating multiple service files, but that is not very elegant. You can also use systemd templating, but that is not very flexible. The best way to do this is to use systemd instances.
For the example, we will create a service that runs a Python script. The script will print the value of an environment variable. The name of the environment variable will be the name of the instance. The script will be called env_variables.py and will be located in /usr/local/bin/. The service will be called env_variables@.service and will be located in /etc/systemd/system/. So let’s copy the script from the previous post as it can print the value of an environment variable to the standard output.
Installing Ansible with Python
- 14 July 2023
In posts Installing Ansible on Ubuntu 22.04 and Installing Ansible on Debian 12 Ansible was installed via the package manager. Another option is to install Ansible with Python in a virtual environment so you can have multiple Ansible versions installed on the same machine.
Since Ansible is written in Python, it can be installed in a Python virtual environment which is a self-contained directory tree that contains a Python installation for a particular version of Python, plus a number of additional packages. The virtual environment can be created with the venv module, which is part of the Python since version 3.4.
Installing Ansible on Debian 12
- 09 July 2023
Ansible is a great tool for automating tasks on multiple servers. It is easy to learn and use and it is very powerful. Ansible is written in Python and it uses SSH to connect to the servers or devices you want to manage like routers, switches, etc. There needs to be a central server where Ansible is installed and from there you can manage all your servers or devices.
In this post, we will create that central server and install Ansible on Debian 12 “bookworm” from the official Debian repositories. The first step is to update the system to the latest packages so that we can install Ansible from the official Debian repositories.
Using robots.txt with Cloudflare Pages
- 02 July 2023
Cloudflare Pages is a great way to host your static website. It’s fast, easy, and free to start with. While the egress traffic is free, you still pay in other forms as some bots will crawl your website. This is where robots.txt comes in handy. You can use it to block bots from crawling your website without having to configure anything with in Cloudflare.
The file robots.txt is used to tell bots where to find your sitemap. This is useful for search engines to find your sitemap. The sitemap is used to tell search engines what pages are available on your website. Lets start with a simple example to tell bots where to find your sitemap.
Upgrading to Terraform 1.5
- 01 July 2023
Pinning Terraform versions is a good practice to ensure that your infrastructure-as-code (IaC) is always deployed with a known version of Terraform. This is especially important when using Terraform Cloud, as the version of Terraform used to plan and apply changes is not always the same as the version used to develop the IaC. This can lead to unexpected errors and behavior, but this also requires that you keep your Terraform version up-to-date in the different configuration files.
In post Run Terraform within GitHub Codespaces Terraform was installed in the devcontainer using features. To upgrade Terraform, simply update the version number in the devcontainer.json file as shown below.
Run Terraform with GitHub Actions
- 24 June 2023
In previous post Run Terraform within GitHub Codespaces the Terraform environment was setup within GitHub Codespaces. The next step is to run Terraform with GitHub Actions via Terraform Cloud as part of a workflow and scan the Terraform code with KICS is the first step to reduce technical debt as described in the post KICS.
Let’s start with the workflow file .github/workflows/terraform.yml to run a KICS scan to verify the Terraform code. The workflow is triggered on push and pull request on the master branch. The Terraform code is checked out and the KICS scan is executed. The KICS scan is configured to run on the Terraform code in the directory terraform and the results are stored in the directory build. The KICS scan is configured to run on the Terraform platform and the output formats are JSON and SARIF so the results can be processed later. The KICS scan is configured to fail on high and medium severity issues. The KICS scan is configured to not add comments to the pull request and to exclude the query with the ID 1e434b25-8763-4b00-a5ca-ca03b7abbb66 during the scan.
Installing Ansible on Ubuntu 22.04
- 29 May 2023
Ansible is a great tool for automating tasks on multiple servers. It is easy to learn and use and it is very powerful. Ansible is written in Python and it uses SSH to connect to the servers or devices you want to manage like routers, switches, etc. There needs to be a central server where Ansible is installed and from there you can manage all your servers or devices.
In this post, we will create that central server and install Ansible on Ubuntu 22.04 from the official Ubuntu repositories or from the Ansible PPA repositories depending on your needs. The first step is to update the system to the latest packages so that we can install Ansible from the official Ubuntu repositories.
Create a bootable ISO with kickstart
- 30 April 2023
Installing Linux on a physical or virtual machine can be fun for a couple of time, but configuring a system can be combursome after a couple of times. Red Hat developed Kickstart to install and configure machines via the network, but also as part of an ISO file that can used in a virtual CD-ROM drive or on a bootable USB-drive.
The following steps are required to create a bootable ISO file with a kickstart file and when the ISO file is booted, the kickstart file is used to install and configure the system. Creating a bootable ISO file is not a difficult task, but it is a manual procedure. The following steps are required to create a bootable ISO file with a kickstart file.
Switching to molecule-plugins
- 28 April 2023
Ansible roles are a great way to organize and share your infrastructure-as-code between projects. Those roles can be tested with Molecule, which is a great tool to test your roles against multiple platforms and Ansible versions. Running these tests in a CI/CD pipeline is a great way to ensure that your roles are working as expected and that you don’t introduce regressions.
These tests can be executed in different forms, but the most common one is to use Docker containers. This is one of the configurations for Molecule, and it works great. The example workflow below shows how to run Molecule tests in a GitHub Actions pipeline:
How to minify websites with GitHub Actions
- 12 April 2023
Websites are usually made up of HTML, CSS, and Javascript. These files are usually not minified, which means that they are not compressed. This means that the files are not optimized for the web. This can cause the website to load slower than it should. This is especially true for mobile users. This is where minification comes in. Minification is the process of removing unnecessary characters from the files. This can include removing comments, removing whitespace, and removing unnecessary characters. This can make the website load faster and more efficiently.
Multiple ways to minify these files do exist. One way is to use a minifier online. Another way is to use a minifier locally on your computer, but both of these methods are not ideal. A more efficient way is to use a GitHub Action. This is a way to automate tasks on GitHub. This can be used to minify these files before creating an artifact and deploying this artifact to the web.
How to optimize PNG images
- 26 March 2023
PNG is a lossless image format that supports transparency. It is a good alternative to JPEG for images with a lot of detail and/or transparency. However, PNG images can be quite large. This post shows how to optimize PNG images instead of converting images to WebP as not everyone is ready to publish WebP images yet.
With optipng you can optimize PNG images. It is available in the repositories of most Linux distributions as shown below for Ubuntu and Debian.
How to Convert Images to WebP
- 25 March 2023
Websites have been using PNG and JPEG images for a long time. PNG images are lossless and JPEG images are lossy. PNG images are larger in size than JPEG images. WebP is a new image format that is developed by Google. WebP images are smaller in size than PNG and JPEG images and can be both lossy and lossless. WebP images are supported by all modern browsers nowadays and making it ideal see how you can quickly convert images to WebP and make web sites faster and more efficient to load.
The first step is to install the webp or libwebp-tools package. The package includes the command line tools to convert images to WebP and to view WebP images. The package is available in the default repositories of Ubuntu, Debian, Fedora, and CentOS. On Ubuntu and Debian, the package is called webp.
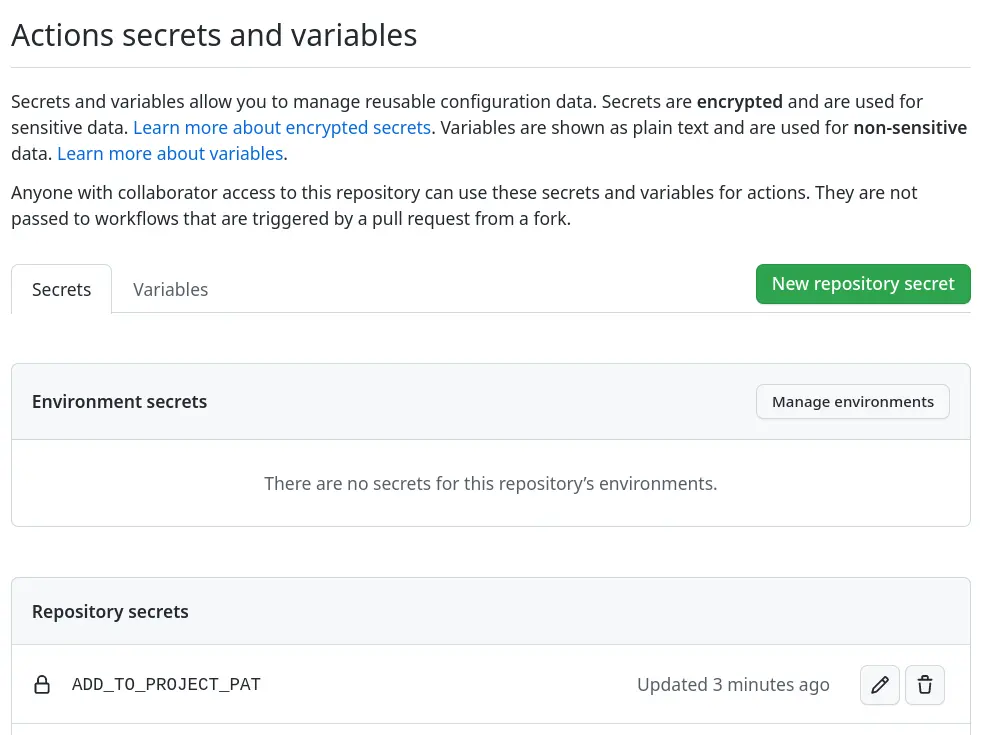
Add issues to projects on GitHub
- 22 March 2023
Adding issues to projects on GitHub is a great way to keep track of what needs to be done. This action will add issues to a project board on GitHub when they are opened or labeled. But adding issues to a project board is a manual process. The action actions/add-to-project automates the process of adding issues to a project board.
In the workflows the environment variable ADD_TO_PROJECT_URL is used to define the project board. The project board is defined by the URL of the project board. The URL can be found in the browser when the project board is opened. The URL is defined in the env section of the workflow file.
Implementing a Content Security Policy
- 21 March 2023
Implementing a Content Security Policy (CSP) for a website can be a daunting and difficult task as it can break your website when done incorrectly. But a CSP can help to guard against cross-site script attacks and data injection attacks on a website as it defines which resources are all allowed to be loaded or executed. This also reduces the risk of including unauthorized third-party content to be included or posted to another site.
Configuring CSP can be done by adding a HTTP response header or by adding a META-tags to the requested HTML content. The latter depends on the CMS to be executed correctly for all HTML content requested. Most sites therefore implement the HTTP response header method as all the common web servers and content delivery networks support this.
Fix an Ansible-lint key-order violation
- 25 February 2023
Ansible allows for structured configurations on how to deploy applications and servers, but also for repetitive tasks. All these actions are defined in YAML files that rely on indentation and this is where Ansible can act in a way that isn’t expected. With yamllint most formatting and layout issues can be found, but with ansible-lint also common mistakes for Ansible can be detected.
As ansible-lint is a step in the CI-workflow a dependency upgrade started a CI-workflow to scan all Ansible Playbooks to be scanned with the latest version of Ansible-lint and found a violation that must be resolved before the pull request can be successfully merged. Running Ansible-lint after checking out the code the error shown below was found and indicates that the order of the keys in YAML isn’t in the correct order.
Label and close stale issues
- 10 February 2023
Issues and pull-requests are part of projects and repositories, but can also be forgotten when they grow out of control. You could search for stale issues manually once in a while, but it is another task on someone’s calendar that has been done. Like with post Add labels to GitHub pull requests this also can be automated. This way the backlog can be kept small so the team working on doesn’t have too much outstanding and untouched work.
Both GitHub App probot/stale and GitHub Action actions/stale are solutions that can be used to scan for stale issues and pull-requests, and label them or even close them. Both solutions have their benefits and drawbacks, but let’s see how they’re configured.
Add labels to GitHub pull requests
- 08 February 2023
Labels on issues and pull requests can make it easier to understand the content, but also make paying attention to what has changed and selecting them easier. If a pull request only has the label terraform for example it indicates that only infrastructure changes are in play.
While multiple GitHub Actions exist the two main solutions are Probot Autolabeler and GitHub Actions Labeler. The first solution is based on a GitHub App that must be installed and have permission to update pull requests, the second solution is based on a workflow that runs a GitHub Action.
Create GitHub issues on a schedule
- 04 February 2023
In post Custom GitHub templates for issues, the first step was made to automate the workflow more by defining issue templates on the organizational level and assigning labels when creating a new issue. A human still needs to create the issue manually while some issues must be created on a schedule to deploy new certificates or run an Ansible playbook to patch servers for example.
Like in post Start using GitHub Dependabot where merge requests were automatically created for updated dependencies, issues can also be created on a schedule. Let’s create a workflow that creates an issue every month for recurring maintenance that must be done.
Custom GitHub templates for issues
- 03 February 2023
Automating workflows reduces the need to think about them, but can also guide new people in the right direction. One of these workflows is creating issues for example. One could use the default templates provided by GitHub to create an issue for a bug or a new feature. Only default templates may not fulfill all requirements needed for a smooth workflow for a project on GitHub.
By default, GitHub has templates for issues and pull requests, but on both organization and repository levels, an override can take place. Meaning that the most specific template set will be used when creating an issue or pull request. First, we will define templates for the whole organization by creating the .github repository within the organization.
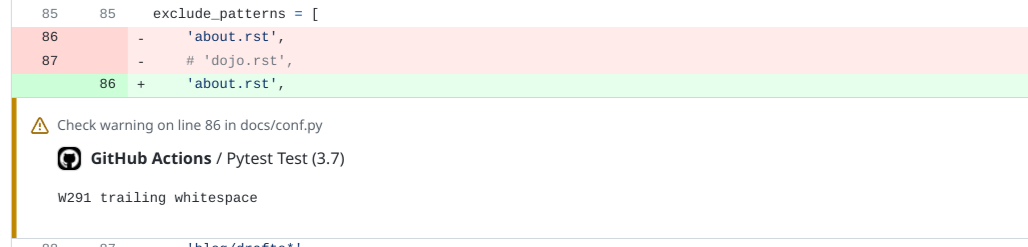
Extending GitHub Actions with Annotations
- 04 January 2023
With the introduction of GitHub Actions automated testing became more accessible and integrated into the pull requests to make it more clear what is being merged and if it checks off all requirements. This makes other services like Dependabot easy to use and keep your code up to date, but these small changes in dependencies for example. Reviewing code or documentation changes can be more difficult when a linter like yamllint or flake8 gives an error or warning as you have to dig into the logs to search for what is wrong.
GitHub Actions also support annotations that can be presented in the web interface to directly see which notifications there are including files and line numbers as shown below. This way feedback from a workflow executed by GitHub Actions is presented in the web interface.
Require a specific Terraform version
- 03 January 2023
HashiCorp offers Terraform Cloud as a service to run Terraform and keep the state instead of having a local copy of the state databases. This is great to make full use of Infrastructure-as-Code tools like Terraform and everyone can run them without losing the correct state. But when setting up a deployment plan a specific version of Terraform has to be selected manually in the webinterface, and you also have to manually increase it when new versions come out.
As the version, for now, can only be set via the webinterface of Terraform Cloud and allow a lot of people to forget to set it to a higher version causing life-cycle-management issues plans do work for repository A, but not for repository B as both plans use a different version of Terraform. While currently now option exists to define the version of Terraform to use when the plan runs, the configuration allows to specify the version of Terraform is required.
Use specific Vagrant version on Fedora
- 21 August 2022
Vagrant is a tool for building and managing virtual machines locally with just a few commands and a single file. It is a good way to get started with infrastructure-as-code on your local machine. Vagrant is also shipped with Fedora to make it easier to install and use as it uses libvirt to manage the virtual machines running on Linux with kernel virtualization to provide virtual hardware. This works well until you also want to install Terraform from the HashiCorp repository and later you upgrade Vagrant to a newer version with a regular package update.
In the example above Vagrant fails to find libvirt to connect to KVM and manage the virtual machine. Multiple providers are available for Vagrant to use, but the one that is used is not the one that is installed on the machine or can be used. This is a known issue with Vagrant on Linux and does not use the system Ruby environment with the lirbary for libvirt. Downgrading to the version of Vagrant that is shipped with Fedora will fix this issue.
Run Terraform within GitHub Codespaces
- 20 August 2022
Using GitHub Codespaces allows you to work on your code from almost any place in the world without an Internet connection. Only the devcontainers powering Codespaces are mended to be short-lived and not contain any credentials. This may pose a challenge when you’re depending on remote services like Terraform Cloud that require an API-token to work properly.
Most devcontainers are following the Microsoft devcontainer template and those are based on Debian which gives you access to a huge repository of packaged software. Only Terraform isn’t part of the standard Debian repository, but HashiCorp provides its own repository that can be added. Let’s start by extending the Dockerfile to add the repository and install the Terraform package as highlighted below.
Scanning with KICS for issues in Terraform
- 28 May 2022
During a recent OWASP Netherlands meetup security scanners were discussed to prevent mistakes and also Checkmarx presented their tool KICS for scanning for security vulnerabilities and configuration errors in Infrastructure-as-Code. Development of KICS goes fast since late 2020 and can catch some common mistakes with known Infrastructure-as-Code definitions like Terraform, Cloudformation, and Ansible for example.
KICS can be used as a standalone scanner as it is written in Go and with GitHub Actions. For now, let’s test it with a Terraform configuration in a GitHub Workflow to see how it works and how useful it is. Maybe in the future, we will test it with Ansible and Docker as well.
Finding the longest or shortest item in a list
- 26 May 2022
Python is a powerful language to quickly and efficiently do work with data, but it requires a more in-depth knowledge of the language to write more elegant and readable code. For many new Python programmers, this is a catch-22 as they’re still learning all the details and it takes time. Let’s take a simple example about finding the longest string in a list and simplify some code. Secondly making the code faster as we will use built-in functions at machine speed instead of interpreting Python code.
The example is a for-loop over a list and checks if the new item is longer than the current longest item before it stores it as the longest. Afterward, it prints the result which will be longest in this case.
How to manage your dotfiles
- 21 May 2022
On Unix systems, dotfiles are files that are stored in the home directory and contain configuration information. The XDG Base Directory Specification already splitted them in three categories and most applications how store their files in .cache, .config, and .local based on their purpose. And a small subset of application sticks to the root of the home directory like the most shells. In most cases you don’t need to manage your dotfiles across multiple machines, but for the ones you want to manage across multiple machines or want to be present in your devcontainer, you can use a utility like RCM and a dotfiles repository.
The first step is to create a repository on GitHub and we use the GitHub command-line tool for this, but it can also be done via the web interface. After creating the repository, it is renamed to .dotfiles at the root of the user’s home directory and makes it hidden.
Using the getent command
- 30 April 2022
The command getent is not known to many users but it is very useful when you need to get information about users, groups, or other entities. The command can be used to get information about users, groups, or other entities for example without having to know where the information is stored.
The syntax of the getent command is simple to use as it takes the name of the data source and possibly the name of the entry to retrieve.
Removing invalid state from Terraform
- 23 April 2022
Terraform keeps a cache of state files in the .terraform directory stored in Terraform Cloud so that it can be accessed by everyone in the organization. For existing resources Terraform has to import the state for a defined resource otherwise it will fail. Sometimes the state is invalid or an API will return an unexpected code and Terraform will fail to proceed.
The example below passed the error from the Cloudflare API via Terraform Cloud to the user but does not indicate the error. After verifying the state manually some resource records were already removed from the zone and triggered an 81044 error. But the state was not removed and Terraform Cloud could not find the resource record to remove from the state database.
Migration to Cloudflare Pages
- 23 December 2021
What started as a custom content management system quickly moved to WordPress to improve its maintainability and that solution served its purpose over the years. Having an easy web-based editor to maintain every is a good thing, but sadly also a bad thing. WordPress is a known target for attacks and you have to keep up to not be compromised, but this also means you have to keep up with how WordPress generates its pages otherwise the pages will not be shown correctly.
To reduce time and complexity, another solution was required as deploying WordPress with content every time wasn’t very effective. Most of the content was already in Markdown format to bypass certain limitations the next step came how to deploy them from GitHub. Static website generators like Jekyll, Sphinx, and Pelican came into the picture as they would remove the dependencies for installing code and a database.
Start using GitHub Dependabot
- 31 October 2020
GitHub bought a service called Dependabot a while back and is now integrating this service as a GitHub Application into the ecosystem. This allows GitHub users to automatically do dependency management and get alerted when a security-related update has been found. For a while this service was in beta but it is now enabled for all public repositories and can be enabled for private repositories as well.
Let’s start simple and create file .github/dependabot.yml in the repository with the content below will tell Dependabot to scan all your GitHub workflows daily for GitHub Actions that are defined and have a newer release available. It will also create a pull request that can be merged when approved.
Archiving YouTube
- 01 October 2020
YouTube is one of the biggest video streaming sites on the Internet and you can find a video for basically everything on it. But in some cases, you can’t find a video anymore or it has been taken down or set to private for some reason. Having a local copy for personal or legal purposes can be useful, but by default YouTube only allows creators to export their content.
With the tool youtube-download, you can download the audio and/or video, and also subtitles in the languages you desire. The example below downloads the audio and video, and subtitles in English and Dutch. Also, it limits the frame size to 1920×1080 and stores everything in an MP4 container.
Native exFAT support on Fedora 32
- 18 July 2020
A lot has changed since 2018 when exFAT was kept out of Fedora due to patent issues and a third-party FUSE-driver needed to be used. Until recently the GPLv2 based driver from Microsoft wasn’t enabled in the kernel as it was based on an older specification and wasn’t fully functional for everyday use.
Fedora 32 recently received an upgrade to kernel 5.7 and with that, the native exFAT driver was enabled during compile time. The driver got a lot of updates from Samsung to work correctly to the latest specifications.
Docker on Fedora 31 and 32
- 18 May 2020
For Developing inside a Container with Visual Studio Code, one of the requirements is to use Docker Community Editon as the version of Docker that ships with Fedora is too old and misses certain features. Also the new Docker alternative Podman from Red Hat isn’t supported by Visual Studio Code.
After installing Docker CE on Fedora 31, cgroups version 1 needs to be enabled as Linux switched over to cgroups version 2, but Docker still depends on version 1. With the commands below cgroups version 1 can be enabled again and requires a rebooting of the system.
Environment variables set by systemd
- 02 July 2019
Applications sometimes need environment variables to be set for triggering certain behavior like giving debug output or routing traffic via a HTTP-proxy for example. A common way is to modify the start-stop script, but with systemd on most Linux systems, like Debian and Red Hat based distributions, this can also be directly set within the unit file and you don’t have to export the variables anymore.
Let’s start with a Python script to read and print the environment variables set by the environment to see how this works. The Python script below that we run via systemd checks if environment variable VAR1 has been set and will generate different output based on that.
Connecting to legacy servers with OpenSSH
- 25 June 2019
Phasing out legacy cryptographic algorithms can always be an interesting endeavor as terminating too early breaks stuff and too late can lead to a compromise. OpenSSH disabled Digital Signature Algorithm (DSA) with version 7.0 in March 2015 as 5 years earlier it was discovered that DSA was compromised and labeled as insecure. Normally this shouldn’t be a problem with a normal software life cycle, but sometimes you will encounter a legacy box that will not be upgraded as it will break things. Now it will stop new connections from being set up from being upgraded to machines as with SSH.
For an incidental connection from the command line, the algorithm can be enabled again to connect with a legacy machine.
Setting a different libvirt uri for Vagrant
- 18 June 2019
HashiCorp Vagrant normally selects the right hypervisor, but the version shipped with Fedora 30 prefers to run within the QEMU user session of the hypervisor. A .Vagrantfile it would match the default behavior which doesn’t require any system privileges is shown below.
In some cases a virtual machine needs to run on QEMU system level and that can be done by changing the domain.uri from “qemu:///session” to “qemu:///system”. Vagrant now creates the virtual machine at the system level of the hypervisor and isn’t depending on any user environment to run.
Using bare variables in Ansible 2.8
- 02 June 2019
Ansible 2.8 was released in May 2019 and later in May came to Fedora 30 in package form. So the first tests could be done to see what needed to be done to switch from 2.7 to 2.8 and don’t generate a lot of stopped GitLab CI jobs due to new warnings and errors. Let’s start with one warning that needs to be resolved before the 2.12 release and also is given on many third-party roles.
The example code above is simple enough to get the warning about CONDITIONAL_BARE_VARS. We could opt for disabling the warning in ansible.cfg and move forward, but as this is the technical debt we don’t want to get more and resolve the current debt as quickly as possible.
Redirecting to mobile Wikipedia
- 05 April 2019
Wikipedia both has a traditional and progressive website that is shown on mobile devices. After years the progressive website is still not shown on desktops sadly enough, but with a browser plugin a redirect can be triggered to the mobile site in most browsers. This as the Redirector plugin works at least in Mozilla Firefox, Google Chrome and Chromium, and will most likely also work in future when Microsoft Edge switches to the Chromium engine.
The configuration in JSON-format below can be imported to setup the Redirector plugin. After enabling the redirect rules, the browser should redirect the Wikipedia to the mobile Wikipedia website.
Using YUM history to see package changes
- 03 February 2019
When you install or update packages on your system, then changes may occur that were not expected. Recent security updates on a server and left Nagios in a failed state, but what exactly happened, and can it be traced back as yum-cron installs all required security updates? Luckily YUM keeps a history database of all actions and with yum history can you list all transactions.
As transaction 15 was the latest and only transaction before the defect occurred it is the one to look into. With yum history info the details of the transaction can be shown. It shows when and who triggered the transaction, but also with which version of RPM, YUM, and which plugins for YUM were used. Most importantly it also shows which package was updated with versions used and from which repository. This narrows the search down to the packages shown as updated and sees what they changed on the system.
Check HTTP with telnet
- 26 January 2019
HTTPS may become the standard quickly, but Hypertext Transfer Protocol (HTTP) is still the base, and understanding how to verify an HTTP server without a web browser can be very useful. A lot of situations simply don’t allow you to install a web browser or gives only a blank page.
As HTTP is a plain-text protocol you can simulate a connection with telnet on the command line. So let connect to a fresh Linux machine with Apache running and see what happens. After connecting you type in GET /index.html HTTP/1.1 to tell web server which files you want to get and in this case the file in /index.html. The second line tells the web server for which website you make the request which is 192.168.121.7.xip.io in the example. And finally, you give an additional entry to tell your request is complete and can be processed after which you get the response.
PHP 7.3 and forbidden functions
- 03 January 2019
Last month PHP 7.3.0 was released and with that a lot of functions or aliases were deprecated that may lead to issues down the road. While Xdebug still needs to be released for PHP 7.3 an automated test with GitLab isn’t possible yet as the build phase of Xdebug fails. Luckily I’m using PHP CodeSniffer and extending phpcs.xml.dist with the lines below make the build already fail if any of the forbidden functions are being used in the code.
Hopefully PHP Code Sniffer will be extended to check on deprecated constants as well, but for now all code running on PHP 7.2 can be checked to run smoothly on PHP 7.3 and later.
mount: unknown filesystem type ‘exfat’
- 15 September 2018
exFAT has been chosen by the SD Card Association as the standard file system for SDXC cards with 32 GiB or more of storage. Sadly the Fedora Project has chosen not to bundle support for exFAT due to patent issues. A free implementation of exFAT has been made and is available via RPMFusion Free for RPM-based systems.
If you now try to mount your SD-card in Nautilus for example it should mount your drive. The performance should also be better than with NTFS as there is less overhead.
Percent Lifetime Used attribute for SSDs
- 27 December 2017
Solid-state drives sound ideal as they have no spinning parts and are very quiet, but they have a limited lifespan as you can’t write a memory cell only an X amount of times. But how to check your SSD on Linux to see if it is still in good shape? S.M.A.R.T. has become the standard for disk health years ago and can be queried by smartctl. So if we query for the health status and show all available attributes we get a good overview.
The most interesting attributes are 202 on how much lifetime is left, but also 5, 180, and 9 that show you the number of replaced storage cells and how many hours the disk has been running. If attributes 5 and 180 are changing it is most definitely time to replace this solid-state drive as memory cells have been worn out.
Monitoring GitHub for new releases
- 17 December 2017
Big sites like GitHub or GitLab are hosting a lot of projects and have numerous of releases a day. And while you as a person can watch a repository on GitHub, you can’t filter out new releases easily. At least not easily findable in the interfaces and checking all the repositories manually because they aren’t part of a build process is too much hassle and will fail in the end. So also for me with highlight.js as it has been updated from version 9.11.0 to 9.12.0 months ago.
Looking at some solutions people were writing about on StackOverflow for example was to parse the HTML and use that as a basis for actions to be executed. A quick check and grep of the output shown that we only have links to releases, but no structured data we can easily parse.
Removing SPF Resource Records
- 13 December 2017
With the creation of RFC 4408 also new a record type 99 for DNS was created to identify SPF Resource Records. It was advised to have both TXT and SPF records in DNS with the same content. RFC 4408 was obsoleted by RFC 7208 in 2014 with paragraph 3.1 stating the following:
SPF records MUST be published as a DNS TXT (type 16) Resource Record (RR) [RFC1035] only. The character content of the record is encoded as [US-ASCII]. Use of alternative DNS RR types was supported in SPF’s experimental phase but has been discontinued.
Upgrading from CentOS 7.3 to 7.4
- 15 October 2017
Last month CentOS 7.4 was announced and it was time to rebuild some servers from scratch to make sure all playbooks were still correct as it is always good to know you can quickly (re)build servers when needed. For some other servers, the impact would be big due to huge amounts of data that needed to be moved around and an in-place upgrade would be sufficient.
Upgrading is very straightforward as it the same as the update option with “-obsoletes” flag set which removes obsolete packages. So let start with CentOS 7.3.
Table size in PostgreSQL
- 08 September 2017
Disk space seems endless, until you run out and/or have to pay the bill. The question is how to find tables with a high disk storage usage and with the query below it shows the table and index size, but also the size of TOAST data for PostgreSQL.
After running this query on the development schema and exporting the results to CSV, we can see that a ManyToMany table consumes a total of 39 MB. With over 330.000 entries this seems numbers seem to be fine as the table size is in line with the amount of data stored in it.
Increasing Inotify Watches Limit
- 29 July 2017
After upgrading to PyCharm 2017.2 the notice came that inotify value was too low and the IDE would fallback to recursive directory scanning.
For now the following commands increase the inotify limit to 512k of files.
Using explicit SSH authentication methods
- 08 May 2017
For many Secure Shell (SSH) is a magic sauce to get access to a server and transfer files between servers. But when things go wrong this magic sauce becomes a problem. Let’s start with one example of when things go wrong and how to debug them. First, we start add to option -v to our command to connect to another server to get some basic debug information about the SSH handshake and get to the point the user has to authenticate.
Just before the SSH client prompts for the user’s password two interesting debug lines are shown. The first line is about the authentication methods we can use and the next line shows our client selected method password as we don’t have any methods configured in our SSH client like public key. So we manually disable publickey authentication and set the preferred authentication methods to keyboard-interactive.
Massive file update with sed
- 05 May 2017
Recently I generated kickstart files for a virtual environment where people could experiment and virtual machines could be rebuilt quickly. Sadly enough a typo slipped into the generated files that would make the anaconda installer stops. Every kickstart file could be corrected by the hand of course, but one sed command could also correct the typo in all files in one go.
The Unix toolkit is full of handy tools and options like this and it pays to get to know your environment. Especially when it is your work environment and you’re familiar with the Unix philosophy.
Using GitLab to build LaTeX
- 01 May 2017
Generating documents in PDF form is becoming the standard nowadays, but how to generate them easily when they’re mostly free format? One of the goals of the Offensive Security Certified Professional (OSCP) Certification is writing a report based on the evidence you find. This is where LaTeX comes into the picture as you can easily have multiple files with data and one or more TeX-files combining this into a proper document. The question then also comes “How to optimize this pipeline?”
The first step is to see every report as a git repository where you can store and version all data. And running rubber locally solves the problem to quickly create a PDF from your sources, but wouldn’t it be nice if this part also could be automated? Who didn’t make the last moment change and forgot to run rubber if the document would still compile into a PDF? GitLab CI can luckily also compile LaTeX into a PDF and the notification if your update broke the build process comes for free.
Is CWE-525 still relevant?
- 28 April 2017
During a code upgrade for a web application from Symfony 2.8 to 3.3 it also became time to do some basic tests with Zed Attack Proxy. While most findings were logical and easy to fix, but one was different and it started with the finding below.
Description: The AUTOCOMPLETE attribute is not disabled on an HTML FORM/INPUT element containing password type input. Passwords may be stored in browsers and retrieved.
Subresource Integrity for JavaScript
- 23 April 2017
Including JavaScript files from a CDN can be beneficial in many ways as you don’t have to ship the code with your code and caching can be done by the browser of a proxy server. It also allows for injecting untrusted code into a web page as someone else is hosting the code you rely on. But Firefox, Chrome, and Opera already support Subresource Integrity checking script and link tags. Hopefully, both Safari and Edge (or Internet Explorer) will support it soon.
But how does it work? First, let’s calculate the SHA256 hash of JQuery version 3.2.1 hosted by Cloudflare. Also, keep in mind to verify this number with the official version offered by JQuery. In this example, we download the minimized version of JQuery with curl and run it twice through OpenSSL to generate the checksum and encode the result in base64 format.
Someone Is Learning How to Take Down the Internet
- 16 September 2016
Bruce Schneier has an interesting article about a development that brings back memories from when Stuxnet was discovered.
Over the past year or two, someone has been probing the defenses of the companies that run critical pieces of the Internet. These probes take the form of precisely calibrated attacks designed to determine exactly how well these companies can defend themselves, and what would be required to take them down. We don’t know who is doing this, but it feels like a large a large nation state. China and Russia would be my first guesses.
Kali Linux 2016.2
- 04 September 2016
Last week Kali Linux 2016.2 was released so it was time to make a new VirtualBox instance for it to see the difference from the release in January. But let’s automate a little bit to quickly rebuild virtual machines for Kali Linux.
Let’s create the virtual machine and boot it. In this example it is bound to the wireless network card and allocates an 16 GB disk image as the default 8 GB size for Debian is too small and 10 GB is the minimum advised.
Disabling SSLv3 in Apache
- 29 April 2015
Yesterday I wrote a post about disabling SSLv3 in Postfix and today we take a close look at Apache. While taking a closer look at the current installation of Apache and the version shipped with Debian 8 that was released a few days back it showed that the Apache project or Debian has taken the responsibility to completely disable SSLv2. Hopefully, SSLv3 will get the same treatment soon, as broken security is worse than no security due to a false sense of security.
After a clean install on Debian Wheezy /etc/apache2/mods-available/ssl.conf contains the following entries:
Disabling SSLv3 in Postfix
- 28 April 2015
The POODLE attack was made public in late 2014 and most vendors have taken action to solve possible issues related to POODLE. The time definitely has come to close SSLv3 in all parts of the public-facing infrastructure. By default Postfix still only disallows SSLv2 and hopefully, this will change in the form of stricter default behavior in Postfix or distributions/vendors that stop shipping SSLv3 libraries.
For now, you can set with the postconf command restrictions which protocols shouldn’t be used by Postfix.
Installing SSL certificates on Debian
- 28 January 2015
Installing and configuring SSL certificates is always an issue as to how to create them and where to store them. Most of the time people can find the procedure on how to create them, but they forget all the places where they have placed them. Some initiatives exist to have centralized key stores on systems, but getting applications to use them is still a problem.
Also on Debian is this an issue and key material is all over the system if youre not careful. Some Debian developers tried to fix it, but it ended in a “stalemate” and for now, an additional package called ssl-cert exists to create self-signed certificates. This package also provides a structure for storing commercial certificates and accessing them in a safer way. We install the package ssl-cert for this.
Practical Unix & Internet Security, 3rd Edition
- 21 May 2014
Duplicate implicit target name: “practical unix & internet security, 3rd edition”.
Practical Unix & Internet Security, 3rd Edition is a comprehensive guide to securing Unix and Linux systems. The book covers a wide range of topics, from basic security concepts to advanced topics such as intrusion detection and forensics. It is written in a clear and concise style, and it is packed with practical advice.
Renaming database in PostgreSQL
- 04 April 2013
Sometimes you have a system with legacy naming standards, but you really want to switch over to the new standard to keep all the scripting clean without some exceptions no one is going to remember in 12 months. Oracle had the command ALTER DATABASE, but since Oracle 10 you need to take the database offline and do some magic. MySQL got the RENAME DATABASE option with release 5.1.7 and lost the option again with release 5.1.23 as it was eating data.
Luckily PostgreSQL still has the command ALTER DATABASE so let’s rename a database and the owner. Before we start we need the password and then we need to log in as the PostgreSQL superuser postgres or another account with similar privileges. So first we check the database name and owner.
SpamAssassin to blacklist and unblacklist
- 12 February 2013
SpamAssassin has a feature to blacklist and unblacklist certain e-mail addresses. But recently I noticed something interesting that may need some more investigation. I have all addresses for domain example.org blacklisted, but also unblacklisted certain functional addresses as is shown in the example below.
Now I expected that webmaster@example.org was going to be unblacklisted, meaning the mail would have a spam score of both +100 and -100 making it effective 0 again. This modification resulted in a spam score of +100 and makes me worry that unblacklisting will demand that the domain part needs to be specified instead of having a wildcard. This will require some more testing in the near future, but for now, it may affect other installations.
Starting to stop SQL injections, part 2
- 11 February 2013
In a previous posting, I gave an example of how to make database queries safer by using parameter binding and basically stopping SQL injections. The next step is to make the code more readable and maintainable. This doesn’t sound like a priority for secure software development, but readable code is also code that can be verified and maintained by other people. It gives you the edge to debug problems quickly and invites others to supply patches. So let’s take the example where the previous posting ended.
For one or two parameters this may work, but when queries become bigger you need to start counting, and counting beyond three is a bad idea in most cases. Let’s change the question mark with a named variable called ‘:username’ in this example. One could then use the function bindParam() to specify which named variable needs to be replaced and has additional features, but in this example, we use the standard binding during in execute phase.
Starting to stop SQL injections
- 10 December 2012
In a lot of examples about PHP, strings are concatenated before a database query is executed as below. Some examples advise to use PHP-functions mysql_real_escape_string() and/or addslashes() to make database query safe against SQL-injections. But this isn’t really a solution as when using addslashes() also requires the use of stripslashes() after retrieving data from a database. Some sites show the lack of proper implementation and show the famous ' string on a website.
Like in Perl with DBI, also PHP has PDO that allows for variables to be parameterized while executing a query as in the example below. This removes the need for homemade solutions that don’t cover all use-cases and allows for a way to provide a stable and more secure interface for your applications when communicating with databases.
Cleaning input enough?
- 08 December 2012
Input validation is a known issue, but writing some PHP code today let me write the following and I’m wondering if I forgot something. It is only to make sure no cleansed variable will enter a switch statement for example.
For now, I need to check the code that no $_POST variable is entering the code unchecked before I put the code online. This also includes variables for SQL statements to eliminate SQL injections.
Getting Ext3 or Ext4 journal size
- 31 July 2012
Ext3 is a successor of Ext2 with support for journaling which means it can have a log of all the recent changes it made or is going to make to the file system. This allows fsck to get the file system back in a good state when a power failure happens for example. But what is the size of the journal? Reading the manpage for tune2fs it says it needs to be between 1024 and 102400 blocks which means it can start with 1MB on a file system with a 1KB block size and 4M on a file system with a 4KB block size.
So let’s start to see which inode contains the journal and normally this should be inode 8 unless you have a file system that was upgraded from Ext2 to Ext3 or Ext4.
A /tmp for every user
- 08 July 2012
With the transition towards /run some temporary files will move towards /run/user/, but enough files remain in /tmp. Files that may leak information or be a point of code injection as shown with CVE-2012-3355. A first step is to create a temporary directory for every user when he or she logs in to restrict the exposure of temporary files.
After installing the right module for PAM and enabling it, every user that logs in will get its own directory for temporary files. In this case, based on the user’s ID number, but is still only accessible to the user themself.
Create home directory on first login
- 07 July 2012
Creating home directories for new users can be a difficult task and especially in an LDAP-based environment, but most PAM installations have the option to create a new home directory before the user login is completed. Debian also ships the module mpam_mkhomedir, but without a manifest to set it up correctly. Bug 640918 covers this issue, but for now, creating the file /usr/share/pam-configs/mkhomedir with the content below resolves the problem.
After creating the file, the command below updates the PAM-config to create the home directory when a user’s home directory doesn’t exist. In the example configuration above the default umask is 0027 so only the user and group will have access to the home directory.
Using PAM to allow access
- 23 June 2012
Over the years PAM (Pluggable Authentication Module) has become the standard on Solaris and Linux, and others like AIX and the known BSDs are following. But by default, all services that use PAM are allowing all users to use it unless the service itself takes action. So why not bring the authorization part to PAM and make the decision to allow access directly in PAM?
In this example, we want to allow only access to Dovecot for users who are members of POSIX-group ac_mail. For this, we use a module called pam_succeed_if which can verify if a user is in a certain group or not. Based on the standard PAM file for a service, we create a new file for Dovecot and added the required line to do the authentication.
BtrFS and read-only snapshots
- 21 January 2012
In a previous posting, I started with BtrFS, and as mentioned BtrFS supports snapshotting. With this, you can create a point-in-time copy of a subvolume and even create a clone that can be used as a new working subvolume. To start we first need the BtrFS volume which can and must always be identified as subvolid 0. This as the default volume to be mounted can be altered to a subvolume instead of the real root of a BtrFS volume. We start with updating /etc/fstab so we can mount the BtrFS volume.
As /media is a temporary file system, meaning it is being recreated with every reboot, we need to create a mount point for the BtrFS volume before mounting. After that, we create two read-only snapshots with a small delay in between. As there is currently no naming guide for how to call snapshots, I adopted the ZFS naming schema with the @-sign as a separator between the subvolume name and timestamp.
First steps with BtrFS
- 18 January 2012
After using ZFS on Sun Solaris, I missed the ZFS features on Linux and with no chance of ZFS coming to Linux, I had to do with MD and LVM. Or at least until BtrFS became mature enough and since the Linux 3.0 that time slowly has come. With Linux 3.0 BtrFS supports auto defragmentation and scrubbing of volumes. The second is maybe the most important feature of both ZFS and BtrFS as it can be used to actively scan data on a disk for errors.
The first tests with BtrFS were in a virtual machine already a long time ago, but the userland tools were still in development. Now the command btrfs follow the path set by Sun Microsystems and basically combines the commands zfs and zpool for ZFS. But nothing compares to a test in the real world and so I broke a mirror and created a BtrFS volume with the name datavol:
The hunt for /etc/.pwd.lock
- 09 August 2011
After upgrade Debian to kernel 3.0.0, I saw a hidden file called .pwd.lock in /etc which I didn’t noticed before. Checking other machines gave the same result as shown below, but both without a matching Debian-package or manpage.
As time match at least the installation date of the machine and exists on other machines it appears to be a valid file, but with what purpose? After reading the Linux Programmer’s Manual two functions called lckpwdf and ulckpwdf where candidates for using this file. Checking the source code at Sourceware confirmed that both lckpwdf and ulckpwdf are using the file. And reading the manpage about these functions also confirms its purpose, a lock file the commands like passwd.
Building Internet Firewalls, 2nd Edition
- 31 May 2011
Duplicate implicit target name: “building internet firewalls, 2nd edition”.
Building Internet Firewalls, 2nd Edition is a comprehensive and well-written guide to designing, installing, and configuring firewalls. The book covers a wide range of topics, from the basics of network security to the latest firewall technologies. The book is written for system administrators who are responsible for securing their networks.